
|
Navigation from your Home screen:
 >
>  Employees
Use the Employees tab of the Admin Hub to search, add, edit and deactivate employee records, as well as to manage passwords and user roles of employees.
To view a tutorial for this topic from the web application, click the Tutorials icon ( ), or to view a list of available tutorials.
How To ...
Your employee role must have the Add Employee permission to add employee records. See "Roles & Permissions".
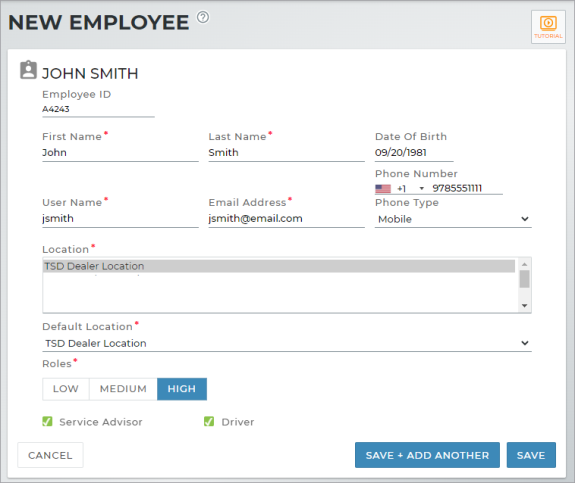
- Click .
- Fill in the required information, marked with red asterisks (*).
- (Optional.) Enter a phone number and select a phone type. (Phone information will come in handy if you have text message alerts set up for your location. See "Alerts" for more information.)
- Write down the employee's User Name, TSD Number, and the log-in URL (https://cirro.tsdweb.com), and provide to the employee to use as a reference when he or she logs on for the first time. At that time, he or she will need to create a password.
- Select one or more Viewership Locations1, then a Default Location to be the employee's current location at log-in.
- Assign a role to the employee. See "Roles & Permissions" for more information.
- (Optional.) Depending on the employee's job responsibilities, consider selecting the Service Advisor check box (to include the employee in Service Advisor lists on appointments and agreements) or Driver check box (to allow driving shuttle units on shuttle agreements or unit on Delivery and Collection agreements).
- Click , or to begin adding another employee. An activation URL is sent to the new employee's email address, allowing him or her to create a password and log in with the TSD Number and User Name you provided. This link expires after 24 hours.
Your employee role must have the View Employee Hub and Edit Employee permissions to view and edit employee records.
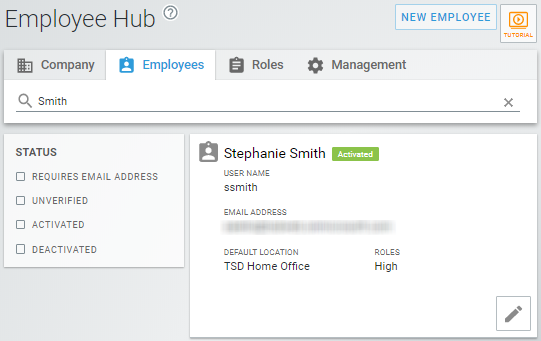
Enter search criteria: On the Employee tab, type search criteria and press Enter or click to find employee records. You can use the Status filters on the left panel to narrow results.
Your employee role must have the View Employee Hub and Edit Employee permissions to view and edit employee records.
- Search for the employee record, if necessary. Click the record from your search results to view it.
- Edit an employee record. Click or view the employee record, and click the Edit button on the side panel. Make your changes, and click .
When it comes to searching for records or selecting a current Location on the Home screen, an employee is limited only to locations to which he or she has viewership.
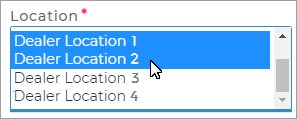
Viewership to virtual TSD DEALER locations is assigned on an employee record, using the Locations box.
- On the Employees tab, edit the employee record.
- Select the locations in the Locations box to which you want to grant the employee viewership. To select more than one option in a list, hold the Ctrl key and click the options, or hold the Shift key and select adjacent options.
- Click .
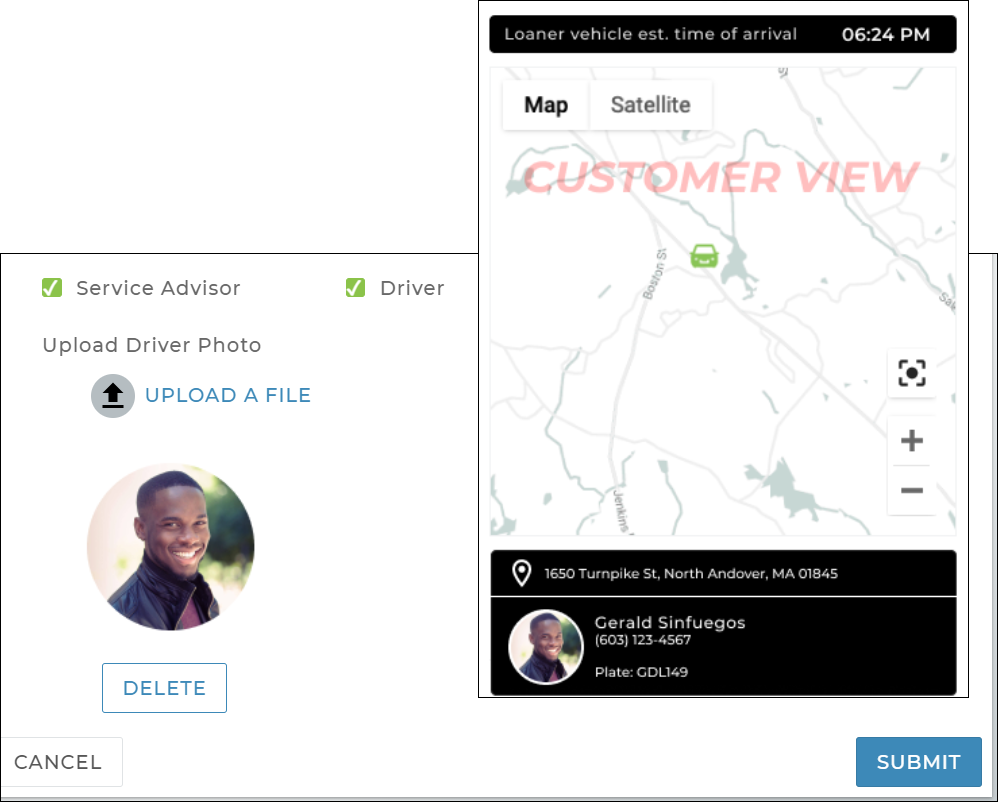
Locations using TSD's Delivery and Collection module can upload a driver photo to an employee record, so your customers can identify the individual delivering or collecting the vehicle.
- On the Employees tab, edit the employee record.
- Click
 UPLOAD A FILE and select the image to upload. A preview is displayed, cropped as a circle.
 - Click . When a customer is tracking their delivery or collection driver, the image will be displayed next to the driver's name.
Hover to view the full-sized image.
To keep your employees up-to-date in the system, you can deactivate an employee record when he or she no longer works for your location.
- On the Employee Hub, search for the employee.
- Click .
- A confirmation message is displayed: "Are you sure you want to deactivate the employee?" Click to continue.
- The employee record is no longer considered active. If you need to reactive this record at any time, you can click .
- Search for the employee, and click .
- Password reset instructions are sent to the employee's email address with a link that allows them to change their password and log in. See "Change your password" in the User Account topic for more information on password requirements.
- View the employee record. The User History displays the employee's last five (5) most recent actions, with the date and time of the action.
- Click to view actions dating further back. Enter a Start Date and End Date to specify a date range of actions, as well as the Modification Types (such as Create) and Entity Types to filter the list.
View the employee record and click the History button on the side panel of the record to view a history of the employee record, including when the record was created and updated.
Glossary of terms
Default Location
Set the employee's current location at log-in, by default; the list contains the employee's viewership locations (and their associated Location Codes). An employee's default location must be an active location.
Driver
Select the Driver check box to indicate whether the employee is eligible to be a driver on Shuttle agreements, Internal Use agreements, and for locations with Delivery and Collection integration, Delivery and Collection appointments and agreements.
Employee ID
This field is required for locations with MDL autoMation integration, to facilitate the process of service advisors being notified by MDL when a unit is returned. See "MDL autoMation Integration" for more information.
Enter a unique employee ID of up to ten (10) characters.
Location Viewership
Viewership to virtual TSD DEALER locations is assigned on an employee record, using the Locations box containing a list of Location Names (and their associated Location Codes). To select more than one option in a list, hold the Ctrl key and click the options, or hold the Shift key and select adjacent options. See "Manage employee viewership to locations" for more information.
When it comes to searching for records or selecting a current Location on the Home screen, an employee is limited only to locations to which he or she has viewership.
Phone Number and Phone Type
You can choose to enter the employee's phone number and select a phone type for that number (e.g., mobile).
Phone information will come in handy if you have text message alerts set up for your location. See "Alerts" for more information.
Service Adviser
A Service Advisor is the employee responsible for assisting the customer during his or her visit.
On an employee record: The Service Advisor check box on an employee record includes the employee in Service Advisor lists on appointments and agreements.
On an agreement: On an agreement (excluding Test Drive), the list of Service Advisors is available to select an employee; the list includes all employees with the Service Advisor check box selected in the employee record. On new appointments and agreements, the selected Service Advisor, by default, is the employee currently logged into the application, as long as the employee is designated as a Service Advisor in his or her employee record.
Roles
A Medium role is required in order to change your role or another employee's role to High.
On an employee record, a role must be assigned to the employee:
- High (access to all application features and functions)
- Medium
- Low
Permissions are defined for each role in the Roles Hub. See "Roles & Permissions" for more information.
Status
When searching for employee records, you can use the following Status filters on the left pane of the Employee Hub.
- Requires valid email address. These employee records require a valid email address. Once a valid email is on file, the employee can receive a verification link to create a password and log in.
- Unverified. The employee record has been created, but the employee has not yet created a password and logged in from the activation link sent to the employee's email address. You can this employee or to send another activation link to the email address on file.
- Activated. The employee is an active employee that has received his or her password by email and logged in.
- Deactivated. The employee has been deactivated. You can or this employee.
© 2026 TSD Rental, LLC